Using mail() function to send email from IIS server:
This is url Read it
Thursday, January 21, 2010
Wednesday, January 20, 2010
Installation PHP&MYSQL in IIS SERVER
TUTORIAL: PHP Application runs on IIS SERVER
There are 3 steps to Configure php,mysql,iis server in windows xp.
Step 1:
Enable IIS Server:
a)If you don't install iis server in windows xp then goto start->settings->controlpanel->Add or Remove Programs->Add/Remove Windows Component and
enable Internet Information Services(IIS) checkbox and proceed installation(need I386 folder in windows xp to complete installation).
b)After successful installation,open IE browser and click http://localhost it will display startup page of iis server.
This is completes IIS server Configuration in Windows.
Step 2:
Configuration PHP in IIS Server:
a)Download latest php zip from this url and extract the zip and place in temporary like (C:\php).
b)Copy php-ini-recommended file and rename to php.ini place it in c:\WINDOWS folder,if php.ini is presented means please take backup and overwrite the file.
c)Make the change extension_dir = "C:\php\ext" in php.ini file.
d)Configure IIS DLL for executing php on iis server.
Do Following thing:--
Start>control panel>administrative tools>Internet Information Service Expand the + buttons on the left side area if any and Right click the label saying default web site. You will get a list of items in the menu and then go to properties section.


Now you can execute PHP code using IIS webserver
Create a file info.php in C:\Inetpub\wwwroot with following code
phpinfo();
?>
Now execute the info.php file in browser using http://localhost/info.php ,then you will observe php configuration in the browser.
Note: Currently You cannot execute Mysql commands in php application.
Step 3:
Install Mysql in php
a)Download MYSQL from this url and install by click on the .exe through wizards.
b)Copy libmysql.dll file and place it in c:\WINDOWS\SYSTEM32 folder.
C)Edit php.ini from c:\WINDOWS folder to enable mysql library to php
Remove ; (mark) for this two dll's
extension=php_mysql.dll
extension=php_mysqli.dll
Now you can execute php+mysql application.
Good Luck
Monday, January 11, 2010
Module Development In Joomla 1.5x
TUTORIAL FOR COMPONENT
This article will discuss about the basic of module development in Joomla! 1. we are going to create a module which will randomly display the comment from guestbook comonent.
Preparation
For the preparation, you can use this insert statement to register your new module to Joomla! database.
INSERT INTO `jos_modules` (`title`, `ordering`, `position`, `published`, `module`, `showtitle`) VALUES
('Comment', 19, 'left', 1, 'mod_comment', 1);
Write The Code
Developing module is simpler than developing component. For the start, you just need one file to store your PHP code. So, create a new folder called mod_comment under modules folder inside your Joomla! root folder.
Then, create a new file inside your new folder and name it mod_comment.php. With this file, we're going to display a random comment from guestbook including the sender name and the sending date.
Run It
Now, open your Joomla! web, you will got a randomize comment displayed on your module. You can refresh your page to see if it works. You can also manage its placement from the Joomla! administration page.
Tuesday, January 5, 2010
Generate Portal using with PHP+MYSQL in Liferay
Implementation Of Portal in Liferay Using PHP:
According to the Post Number 13 from http://www.liferay.com/web/guest/community/forums/-/message_boards/message/214438;jsessionid=D538D102BA519B77651E1B65235D6A23?_19_threadView=flat
Assuming that you install/configure LIFERAY Portal setup in windows machine and Unable to access administration panel like this
STEPS:
1)Here i am using default php portal i.e sample-php-portlet (location c://liferay-portal-5.2.3\tomcat-5.5.27\webapps\sample-php-portlet)
2)Now add below code the index.php after $_POST[];
-------------------------------------------------
//CONNECTION STRING FOR MYSQL DATABASE:
$dbh = new PDO('java:comp/env/jdbc/MySQLDatabase');
if ($dbh) {
$sql="SELECT *FROM emp WHERE name = '".$usr."'";
foreach ($dbh->query($sql) as $row) {
echo "
";
}
------------------------------------------------------------------------
3)Add Configuration setting at the end
c:\\liferay-portal-5.2.3\tomcat-5.5.27\webapps\sample-php-portlet\WEB-INF\web.xml file
-----------------------------------------------------------------------
DB Connection
jdbc/MySQLDatabase
javax.sql.DataSource
Container
-----------------------------------------------------------------------
4)Add Configuration to map the database to the portal in c:\\liferay-portal-5.2.3\tomcat-5.5.27\webapps\sample-php-portlet\META-INF\context.xml file.
-------------------------------------------------------------------------------
username="root" password="kmipl" driverClassName="com.mysql.jdbc.Driver"
url="jdbc:mysql://localhost:3306/test?useUnicode=true&characterEncoding=UTF-8"/>
-----------------------------------------------------------------------------------
NOTE:
If context.xml is not available means, Please add a context.xml under META-INF with above content.
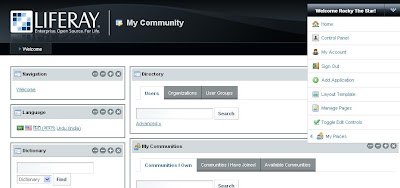
Adding PHP Portal using Liferay Interface.
ADD PHP PORTAL TO LIFERAY SITE
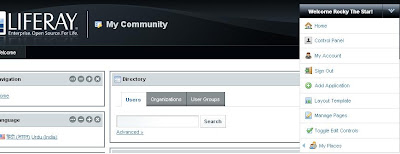
1)Click on the Add Application
2)Select sample-php-portal in the administration section and
3)Click on add link and portal will be enable on the website.
According to the Post Number 13 from http://www.liferay.com/web/guest/community/forums/-/message_boards/message/214438;jsessionid=D538D102BA519B77651E1B65235D6A23?_19_threadView=flat
Assuming that you install/configure LIFERAY Portal setup in windows machine and Unable to access administration panel like this

STEPS:
1)Here i am using default php portal i.e sample-php-portlet (location c://liferay-portal-5.2.3\tomcat-5.5.27\webapps\sample-php-portlet)
2)Now add below code the index.php after $_POST[];
-------------------------------------------------
//CONNECTION STRING FOR MYSQL DATABASE:
$dbh = new PDO('java:comp/env/jdbc/MySQLDatabase');
if ($dbh) {
$sql="SELECT *FROM emp WHERE name = '".$usr."'";
foreach ($dbh->query($sql) as $row) {
echo "
".$row['name'] . "
";
}
------------------------------------------------------------------------
3)Add Configuration setting at the end
c:\\liferay-portal-5.2.3\tomcat-5.5.27\webapps\sample-php-portlet\WEB-INF\web.xml file
-----------------------------------------------------------------------
-----------------------------------------------------------------------
4)Add Configuration to map the database to the portal in c:\\liferay-portal-5.2.3\tomcat-5.5.27\webapps\sample-php-portlet\META-INF\context.xml file.
-------------------------------------------------------------------------------
username="root" password="kmipl" driverClassName="com.mysql.jdbc.Driver"
url="jdbc:mysql://localhost:3306/test?useUnicode=true&characterEncoding=UTF-8"/>
-----------------------------------------------------------------------------------
NOTE:
If context.xml is not available means, Please add a context.xml under META-INF with above content.
Adding PHP Portal using Liferay Interface.
ADD PHP PORTAL TO LIFERAY SITE

1)Click on the Add Application
2)Select sample-php-portal in the administration section and
3)Click on add link and portal will be enable on the website.
Monday, January 4, 2010
Generate Week Date Using Date & Strtotime Function
I published on 2010-01-05 date.
So Output we be as follow :
$current_day = date("N"); //numeric representation of the day of the week : 2 for(Tuesday)
$days_to_friday = 5 - $current_day; // print 3 output
$days_from_monday = $current_day - 1; //print 1 output
$monday = date("Y-m-d", strtotime("- {$days_from_monday} Days"));
$friday = date("Y-m-d", strtotime("+ {$days_to_friday} Days"));
$timestampoffrom = strtotime($monday);
$timestampofto = strtotime($friday);
Mutlisites Using Drupal6.x
Running multiple sites on a local PC (localhost) from a single codebase, using Windows
REF. http://drupal.org/node/32715
http://drupal.org/node/53705
Here's how to get mutltiple sites working on localhost using Windows XP. NB: This post was originally written for Drupal 4.6.x but has been updated for 6.x so some of the comments below are now obsolete.
Preparation
Assume you're starting with a working D6.x installation, have followed the installation instructions and got the default site up and running. If not, start here http://drupal.org/getting-started/install.
Multi-site setup
OK, to set up multi-sites there are four stages to go through, but it's not difficult:
1. Set up your databases, one for each website
2. Set up each site in Drupal
3. Edit the virtual host settings in Apache
4. Update the Windows hosts file
In the following example we will add a local site"http://testsite1" in addition to the default site. We'll assume Drupal is installed in c:/www (and that your web root is set to c:/www in the apache config file, apache\conf\httpd.conf).
1. Databases
Firstly we will set up a new database for 'testsite1'
1. Use SQLyog and log into your DB server at localhost.
2. Ctrl+D to create a new database. Type a name for your database in the 'create database' textbox ('testsite1' is as good as anything) then click the create button. A new database outline will be added.
3. Repeat for each additional site you want to set up.
2. Drupal
1. Create a new folder /sites/testsite1. i.e. you should now have two folders in your sites folder, default and testsite1.
2. Make sure the folder /sites/default contains an unmodified copy of the file default.settings.php. The installer script will look for this file when installing your new site and the install will fail if it ain't there. If necessary, extract a copy from the drupal install package.
3. Also place a copy default.settings.php in the testsite1 folder and rename it settings.php. Make sure the file is writeable (i.e. the 'read only' attribute is not set) because Drupal will modify this file as part of the installation process.
3. Apache
Important to enable # Virtual hosts in httpd.conf in apache/conf
1. Open the apache config file '\apache\conf\extra\httpd-vhosts.conf'.
2. Scroll to the end of the file, where you will find the virtual hosting setup. Assuming your websites are all located in the folder c:/www then add the following lines (edit the paths as necessary)
NameVirtualHost *:80
DocumentRoot c:/wamp/www/
ServerName localhost
DocumentRoot c:/wamp/www/drupal6
ServerName testsite1
There are lots of other things you can add into your VHost settings - see the Apache documentation.
4. Windows
We now need to tell Windows that the domain 'testsite1' is hosted locally, i.e. not to look on the Internet for it. Open the 'hosts' file with notepad. It can usually be found in c:/windows/system32/drivers/etc
Edit the end of the file to read:
127.0.0.1 localhost
127.0.0.1 testsite1
Save the file.
Apache, again
OK, that's (almost) it. All that is left is to restart the Apache webserver. You could reboot your computer but a better way is to open a command prompt window and type 'net stop apache'. When the service has stopped, restart it using 'net start apache'. If you're using XAMPP then use 'xampp stop' and 'xampp start'.
Now when you open your favourite browser and enter 'http://testsite1' you should see the installation page for your new Drupal site. Enter the database details you created earlier and let the installer script set up the tables for you.
You can add as many sites as you need by following the process above.
Optional additional configuration
Although not essential, here are some things to help keep things tidy in a multi-site setup.
Use a separate files folder for each site
By default, all images and other uploaded files are kept in a single folder. Whilst this works, its a bit messy and better to set up a separate files folder for each site.
• Set up a separate 'files' and 'files/tmp' folders by creating the folders in your sites directory, i.e. sites/testsite1/files and sites/testsite1/files/tmp, sites/testsite2/files, sites/testsite2/files/tmp etc.
• Update the settings for each site by visiting 'admin/file system' and changing the path for the files and temp folders to sites/testsite1/files, sites/testsite1/files/tmp...etc.
Consider the best place to install modules and themes
• If you have modules or themes that you want to share between all sites then store them in sites/all/modules and sites/all/themes respectively.
• If you want them to be available only to one site then store them in sites/testsite1/modules and sites/testsite1/themes (replacing 'testsite1' with your actual site name)
Saturday, January 2, 2010
Testimonial Functionality Using Drupal6.x
Slide the content in the Block(Without Testimonial module ) using Drupal6.x
Modules Required
1)cck
2)views
3)views slideshow
Installation
Login as a administer user into the site
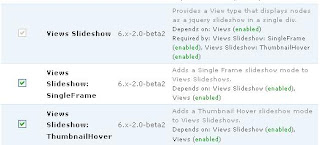
Enable the CCK,Views, Views slideshow.
Enable modules in the image also.
Create a testimonial content type from content management section in administer section.
Add content to that content type.
Create a block using view on the content type testimonial.
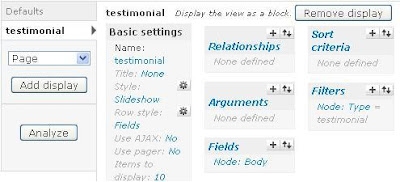
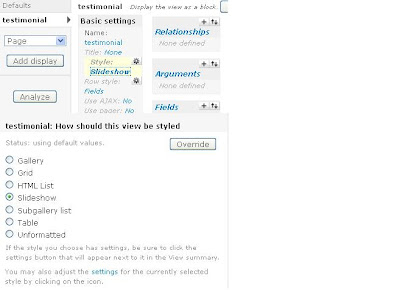
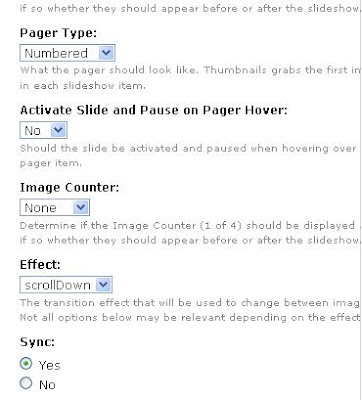
Important configuration to slide the content/text.
click on the style property in the Basic Settings in view Node and enable slideshow radio button and click on the settings link,then select effect option to bottom.
Check the image below.
Final Section:
Enable Block testimonial in the block section
Modules Required
1)cck
2)views
3)views slideshow
Installation
Login as a administer user into the site
Enable the CCK,Views, Views slideshow.
Enable modules in the image also.

Create a testimonial content type from content management section in administer section.
Add content to that content type.
Create a block using view on the content type testimonial.

Important configuration to slide the content/text.
click on the style property in the Basic Settings in view Node and enable slideshow radio button and click on the settings link,then select effect option to bottom.
Check the image below.


Final Section:
Enable Block testimonial in the block section
Subscribe to:
Posts (Atom)